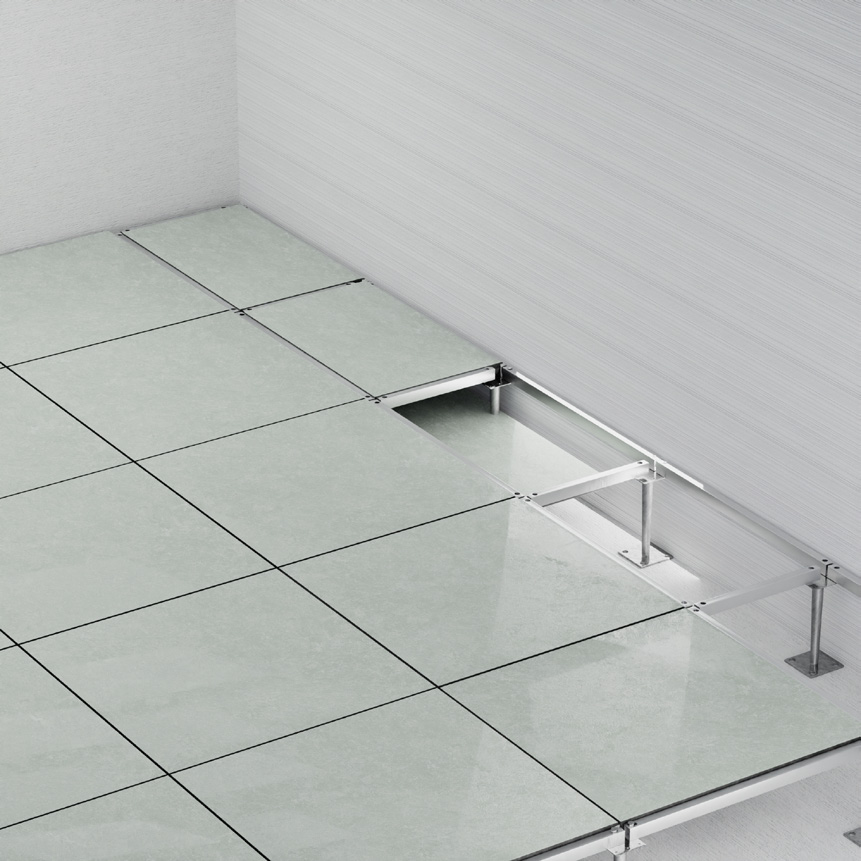
Access floors, also known as raised floors, are functional flooring systems that create an elevated space above the structural floor using pedestals and stringers. This framework supports removable panels, making them ideal for data centers, server rooms, and offices where easy access to cables, wiring, and ventilation systems is essential. This guide breaks down the installation process and key considerations based on the Access Floor Installation Manual.
2. Pre-Installation Ground Requirements
2.1 Surface Preparation
The floor must be installed after the ground is decorated and trimmed. Key requirements include:
• A flat, clean, dry surface free of dust, debris, or moisture .
• Any unevenness or cracks should be repaired beforehand to ensure a stable base for the flooring system.
2.2 Subfloor Infrastructure
All under-floor equipment (e.g., cables, wiring, water pipes, and ventilation ducts) must be fully installed before starting the access floor installation . Large or heavy equipment should be placed on dedicated bases that match the finished floor height to avoid excessive load on the panels .
3. Essential Installation Tools
3.1 Primary Tools
• Cutting Equipment: Used to trim panels for edge fitting, ensuring precise measurements and minimal waste .
• Laser Level: Critical for checking horizontal and vertical alignment, ensuring the floor height is consistent across the entire area .
• Panel Lifter: Designed to safely lift and position panels, preventing damage from manual handling .
3.2 Secondary Tools
• Spanner: For securing pedestal-stringer connections .
• Philips Screwdriver: Used in fixing accessories like edge trims or additional supports .
4. Step-by-Step Installation Process
4.1 Layout and Marking (Step 3)
1. Leveling and Alignment: Use a laser level to confirm the ground is horizontal and walls are vertical . Mark the finished floor height on the walls to establish a uniform reference line.
2. Grid Line Drawing: Measure the room’s dimensions and draw grid lines based on panel size to determine pedestal positions. This minimizes the need for panel cutting and ensures symmetrical placement .
4.2 Pedestal and Stringer Setup
• Adjust all pedestals to the same height using the laser level and secure them at grid intersections .
• Install stringers on top of pedestals where required, forming a stable grid structure to support the panels .
4.3 Panel Installation
• Place panels onto the stringers or pedestals using a panel lifter, ensuring they fit snugly and align with the grid .
• For gaps near walls or edges, cut panels to size and install them carefully. Use a panel lifter to avoid misalignment or damage .
4.4 Final Leveling and Reinforcement
• After panel placement, recheck the entire floor with a level and adjust pedestals as needed to eliminate wobbling .
• Add extra pedestals under areas where heavy equipment will be placed to enhance structural support .
5. Inspection and Acceptance Standards
5.1 Visual Checks
• The finished floor and subfloor must be clean, free of dust, and debris .
• Panels should show no signs of damage, such as scratches or chipped edges .
5.2 Structural Stability
• The floor should be stable, with no wobbling or movement at panel joints when walked on .
• Ensure all connections (pedestals, stringers, and panels) are secure and free of loose components.
6. Usage and Maintenance Guidelines
6.1 Environmental Conditions
• Maintain a temperature range of 15–35°C and humidity between 45–75% RH for optimal performance, especially for antistatic floors .
6.2 Daily Usage Tips
• Avoid using sharp tools directly on panels to prevent nicks or coating damage .
• Never drag heavy equipment across the floor; use trolleys with rubber wheels or place rubber mats under equipment to prevent scratches .
• Handle heavy equipment with extra care, and consider reinforcing supports in high-load areas .
6.3 Maintenance Practices
• Use a soft brush or duster cloth to clean the floor; avoid abrasive or water-based cleaners .
• When accessing under-floor systems, use a panel lifter to remove and reinstall panels safely .
7. Perimeter Finishing and Cleaning
7.1 Edge Treatment
• Cut panels to fit tight spaces near walls and install edge trims or barrier strips for a neat finish .
• Ensure perimeter panels are properly supported to prevent sagging or movement .
7.2 Final Cleaning
• Remove all construction debris, dust, and packaging materials from the floor surface. Use non-abrasive tools to avoid damaging unfinished panels .
8. Troubleshooting Common Issues
Issue | Cause | Solution |
Wobbly floor | Loose pedestals or misaligned panels | Tighten connections and readjust panels |
Uneven panel gaps | Incorrect grid layout | Re-measure and realign panels |
Damaged panels | Improper handling or sharp objects | Use panel lifters and avoid direct impacts |
Surface scratches | Abrasive cleaners or dragging items | Switch to soft tools and use protective mats |
9. Conclusion and Professional Support
Proper installation and maintenance of access floors are critical for their durability and functionality. Following these steps ensures a stable, safe, and accessible flooring system. For further assistance, contact:
By adhering to this guide, you can maximize the performance of your access floor system, ensuring it meets the demands of your space for years to come.
 English
 العربية
 Français
 Русский
 Español
 Português
 Deutsch
 italiano
 日本語
日本語 한국어
한국어 Nederlands
 Tiếng Việt
 ไทย
ไทย Polski
 Türkçe
 Bahasa Melayu
 Filipino
 Bahasa Indonesia
 magyar
 Română
 Čeština
 қазақ
қазақ Српски
 हिन्दी
 فارسی
فارسی Slovenčina
 Slovenščina
 Norsk
Norsk Svenska
 українська
 Ελληνικά
 Suomi
Suomi Հայերեն
 עברית
עברית Dansk
Dansk Shqip
Shqip বাংলা
বাংলা Hrvatski
 Afrikaans
 Gaeilge
 Eesti keel
 नेपाली
 Oʻzbekcha
 latviešu
 Azərbaycan dili
 Euskara
 Български
 Català
 ქართული
 Hausa
Hausa Lietuvių


